Cornmeal-Bourbon Doughnuts with Chestnut-Sage Stuffing

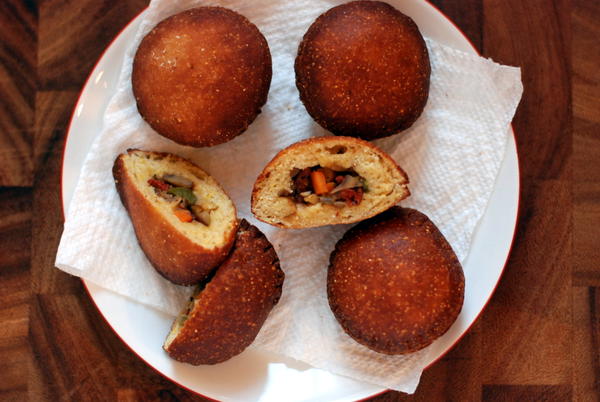
It's doughnut week here on NDP. First up were these sufganiyot filled with the best cranberry mousse of your life. Now? We're going savory. Please welcome my friend and cook extraordinaire, Josh Resnick, who's sharing his unforgettable cornmeal doughnuts stuffed with stuffing. Ever since we tried them, we haven't been able to stop thinking about them. I tested them this past weekend, and while Josh's came out better than mine, even my amateur version was quite delicious. These doughnuts are not to be missed.

1-DSC_0847
1-DSC_0847

Around Passover, I read that Hanukkah and Thanksgiving would coincide for the first, and in

any meaningful sense, last time

.  We have been hosting my wife's family and part of my family for the last three years, so to us, this holiday has already represented a melding of two families' traditions.  A mashup like this would fit right in. So, despite being in the midst of Passover prep, I went into menu planning overdrive.  That's normal, right?

1-DSC_0741
1-DSC_0741
1-DSC_0744
1-DSC_0744

Some options were obvious -

deep-fried turkey

,

turkey-fat latkes, cranapple sauce

.  But that's just the beginning.  

Sufganiyot

, or jelly doughnuts, the ubiquitous dessert of Hannukah, seemed like the perfect canvas for a mashup.  Once you take out the jelly, you can really stuff them with anything, sweet or savory.  After some tinkering, I settled on cornmeal doughnuts with chestnut sausage stuffing.  For this home cook, it has been the answer to the question I didn't even know to ask: shouldn't  more doughnuts be made with meat?

1-DSC_0755
1-DSC_0755

A few notes on ingredients.  I used stone ground cornmeal for some classic cornbread texture.  I also added wheat gluten to make sure the doughnuts were chewy.  If you don't have wheat gluten and don't feel like buying it, I would use bread flour in place of all-purpose and replace the gluten with an equal volume of cornmeal.

1-DSC_0786
1-DSC_0786
1-DSC_0790
1-DSC_0790

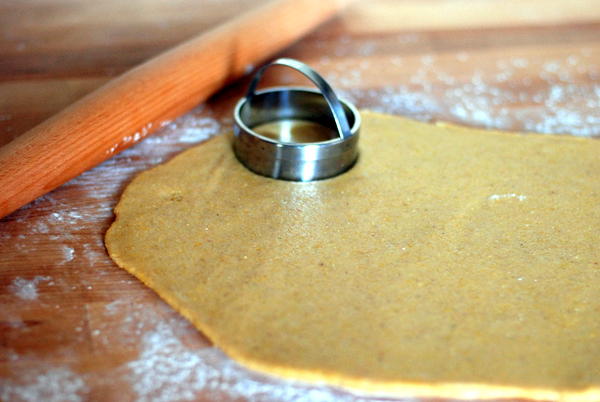
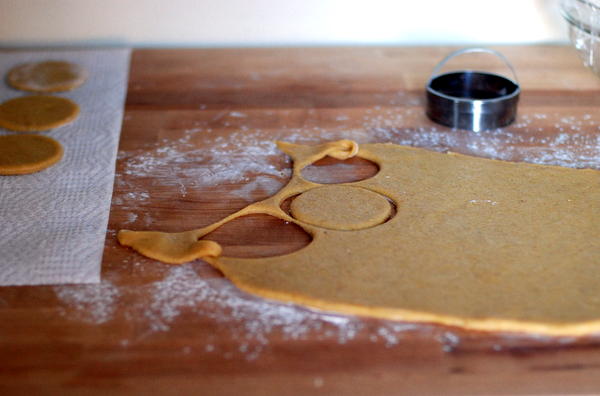
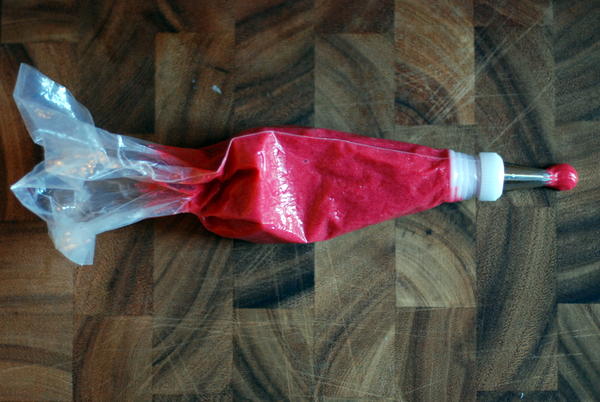
A note on technique.  A clean edge is critical to the shape of the doughnut and to making sure the stuffing stays...well, inside.  After filling the doughnuts, stretch them out a bit and recut them with a biscuit or cookie cutter.  This will ensure a good seal and a clean edge.  You don't want your filling leaking out, and you're not looking for something beignet-shaped.

1-DSC_0842
1-DSC_0842

Rivka again here. Don't skip the recutting step! Also, don't skip this recipe. As you can see and understand, we're kind of obsessed.

Bourbon-Cornmeal Doughnuts Filled with StuffingDough inspired by Bon Appetit; filling by Josh Resnick Makes 12 doughnuts

For the doughnuts: 1 packet (¼ oz.) instant yeast 2 tablespoons warm water 2 teaspoon plus ¼ cup sugar 6 tablespoons canola oil 2 large eggs 3 tablespoons bourbon (Josh uses Weller) ½ cup milk or unflavored soy milk, warmed to 115 degrees (warm-hot) 2 teaspoons salt 2¼ cups plus 2 tablespoons all-purpose flour ¼ cup wheat gluten 1 ½ cups cornmeal

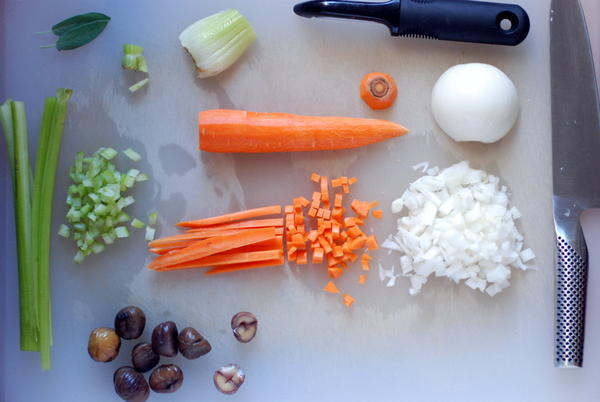
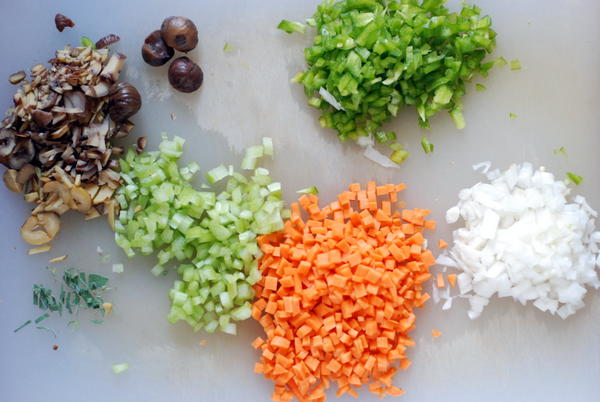
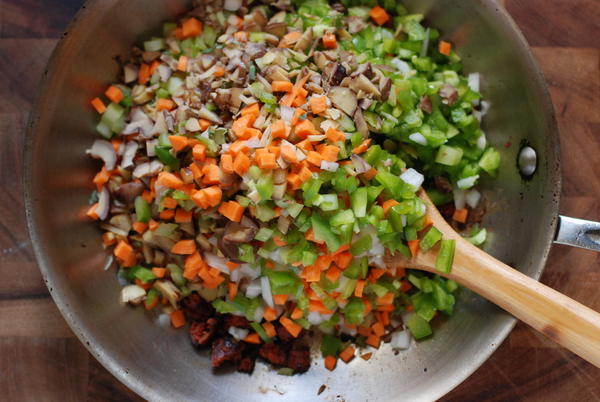
For the stuffing (makes more than needed): 1 tablespoon olive oil 1 sweet Italian sausage, diced ½ medium yellow onion, ¼-inch dice 1 medium carrot, ¼-inch dice 1 rib celery, ¼-inch dice 1 small green bell pepper, ¼-inch dice 3 ounces roasted and peeled chestnuts (about 20), chopped (the pre-packaged ones make life easy) ½ teaspoon salt ¼ teaspoon black pepper 1 teaspoon chopped fresh sage or ¼ teaspoon dried sage

First, make the dough: Combine yeast, water, and 2 teaspoons sugar in the bowl of a stand mixer. Let sit for 10 minutes, until yeast turns foamy. Add the remaining ¼-cup of sugar, wet ingredients, and salt to the bowl. Hook in the paddle attachment and mix on medium speed until combined.

In a separate bowl, combine flour, wheat gluten, and corn meal. Add to the wet ingredients and mix with the paddle attachment about 30 seconds, until fully combined. Then switch to the dough hook and need for two more minutes. The dough will be a bit sticky, but it should start to pull away from the sides of the bowl slightly. If it doesn’t, add flour by the tablespoon until it does.

Scrape dough into a lightly oiled bowl and cover with plastic wrap. Let rise for at least 2 hours at room temperature, until doubled; alternatively, transfer to the fridge and let proof overnight.

Make the stuffing: Put olive oil in a large sauté pan set over medium heat. Add sausage and cook until the fat starts to render and the meat starts to crisp, about 5 minutes.

Add remaining ingredients to the pan and sauté until vegetables have begun to soften, about 5 more minutes. Then add 2 tablespoons of water to the pan, cover with aluminum foil, and cook on medium heat until water as evaporated and vegetables are mostly soft, about 7 minutes. (The carrots should still have the slightest resistance). Cool completely.

Form the doughnuts: On a lightly-floured surface, roll dough into a rough rectangle, ¼ inch thick. Using a 3½-inch biscuit cutter, cut into rounds. Re-roll and cut remaining dough until all dough is used.

Brush each disk with water. Top half of the disks with 1 ½ teaspoons of filling. Set one untopped disk over each topped disk and press firmly around the edges to seal, stretching the edges of each doughnut slightly while sealing; after all doughnuts are sealed, recut each doughnut with the 3½-inch cutter. The cutter does the best job of creating a firm seal.

Place doughnuts on paper towel, cover with a second paper towel, and let rise 45 minutes-1 hour.

Fry the doughnuts: Line a large plate with two layers of paper towel.

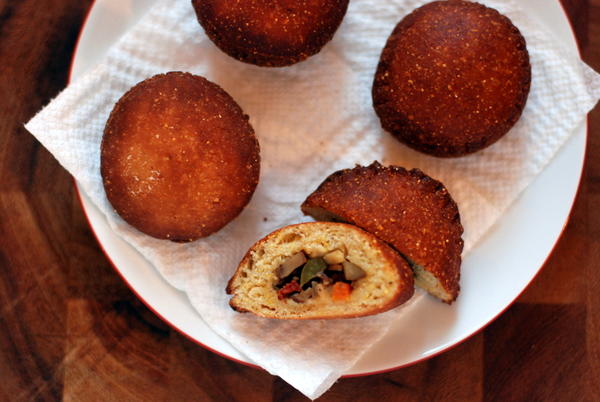
In a large pot, heat 3 inches of canola or other neutral frying oil to 350 degrees. Fry doughnuts about 75 seconds per side, until golden brown. Transfer to the paper towel-lined plate and drain.

Serve hot (with gravy!)

Mozzarella in Carrozza

For food lovers, Hanukkah is an eight-day period in which to justify that guilty pleasure, deep-fried food. Latkes and sufganiyot (jelly donuts) might be the most traditional Hanukkah fare, but they are the tip of the iceberg when it comes to things improved by a hot oil bath.

The reason we eat fried foods on Hanukkah is well-known, if not entirely logical. Because a one-day supply of oil kept the menorah in the Temple lit for eight full days, we have the tradition of consuming as much oil as we can, in remembrance of the miracle. So let's fry some stuff, shall we?

Armed with a legitimate excuse to deep-fry, I took to the kitchen in search of the perfect recipe for one of my favorite weekend lunches, Mozzarella in Carrozza. In Carrozza is Italian for "in a carriage." The name is apropos: fresh mozzarella cheese is sandwiched between slices of white bread and cradled in a cloak of flour and egg, then fried golden-crisp in a bath of butter and olive oil. After a turn over the heat, the mozzarella melts, the bread crisps up, and the sandwich becomes the sort of thing you must eat, immediately, and possibly a few times in a row.

After making a straightforward version of this sandwich a few times, I decided to change it up. Inspired by a recipe for salt and pepper French toast on Food52, I’ve taken the sandwich in a more overtly savory direction, adding cilantro, chives, scallions, and sriracha to the egg batter. The result is plenty spicy, and the herbs bring freshness and levity to an otherwise indulgent dish. The original is good, but this version is downright addictive.

So if you've had your fill of latkes and your looking for something else to dunk in an oil bath, take a swing at Mozzarella in Carrozza. Let Chanukah be your excuse.

Mozzarella in Carrozza Serves 2

6 slices white bread, crusts removed 1 ball fresh mozzarella, sliced 1/2 cup whole milk 3 Tablespoons flour 1 egg, beaten 1 scallion, chopped 5 chives, chopped 1 sprig cilantro, chopped 3 Tablespoons butter 3 Tablespoons olive oil Salt and pepper 1 teaspoon sriracha

Dipping Sauce 2 tablespoons ketchup 1 teaspoon sriracha

Lay 3 slices of bread on a cutting board or work space. Distribute mozzarella slices on the bread. Top each with another slice, and crimp or pinch the edges of the two slices together to form a pouch around the cheese. You should have three sandwiches.

Put milk in one bowl, flour in a second bowl, and beaten egg, herbs, and sriracha in a third bowl. Add salt and pepper to the egg mixture.

Dunk both sides of each sandwich in the milk, then in the flour, and finally, in the egg. Meanwhile, heat 1/2 tablespoon of butter and 1/2 tablespoon oil in a medium frying pan over medium heat. When butter starts to sizzle, place one sandwich in the pan. (If your pan is large enough to hold two at once, add twice the butter and oil, and place a second sandwich in the pan.)

After 2 minutes, check the underside of the sandwich. When it is golden brown, flip and cook the other side another 2-3 minutes, until golden. Repeat with remaining sandwiches.

Meanwhile, make dipping sauce by combining 2 tablespoons ketchup with 1 teaspoon sriracha. Serve sandwiches as soon as they’re ready, with dipping sauce on the side.

Fried Squash Blossoms

Please welcome my good friend Jeremy, who's going at 'em again with his second guest post on NDP. I'm off to Santa Fe, NM for the long weekend, and Jeremy's babysitting the blog (because 4 kids isn't enough!) while I'm gone. Behave now...and get thee some squash blossoms!

I'm not one for begging, but I'm begging you, dear reader, not to miss out on the squash blossom.

For some reason, this extraordinary harbinger of summer seems to scare the bejeezus out of people. For the past month or so of Sundays, I've found myself lingering at a table covered with little wooden baskets filled with these delicate, delicious flowers. And without fail, I've overheard conversations like this one, between two veteran denizens of DC's biggest farmers' market:

"What would I do with them?" -"I don't know." "I mean, I love squash, but the blossom... whatever." -"I know. There must be a reason you never see them on a menu anywhere." "Exactly."

Verbatim? No. But you get the idea. So let's set the record straight, shall we?

First of all, a bit of demystification: they may look exotic, but we're just talking about the flower of the squash or zucchini here. On the farm or in the garden, they're ubiquitous this time of year. Squash are monoecious, you see, which means both male and female blossoms appear on the same plant. Only the female flowers will produce fruit (sometimes you'll see them still attached to smaller zucchini, courtesy of particularly gentle growers). However, early in the season, male flowers tend to dominate the plant, and when they realize there aren't many females around to pollinate, the male blossoms just give up, and drop right off the vine. Lucky us. Later in the season, we get a mix of male and female flowers to gather and enjoy; they all taste awesome.

Secondly, what you do with squash blossoms is fry them. It's so easy a child can do it, which, in fact, my six year-old daughter does (with some supervision around the hot oil, of course).

Finally, the reason you almost never see squash blossoms on a restaurant menu is that by the time they reached your table, they would be past their prime: these little lovelies are at their best straight out of the pan, not after sitting on the slide waiting for your server to make sure your companions' apps are ready to go, too. Chefs get this, which is why you don't see these treats often, even when they're in season, as they are right now. But you can bet that when the pros are at home whipping up a meal for friends, they've got squash blossoms sizzling away to snack on while they cook. And so should you.

The immediacy of this delicacy, the drop-dead simplicity of their preparation, and the uniqueness of their flavor, are what make squash blossoms so special. Harvest. Cook. Serve. Eat. It's what summer food is all about.

Now, you can jazz up squash blossoms if you insist. You can stuff them with a soft cheese -- some swear by ricotta. You can batter them in beer, or sprinkle them with cayenne. But we stick to basics. Olive oil. Flour. Milk. Salt. Squash blossoms. That's it.

So here's what you're going to do. Grab you're favorite skillet -- non-stick works great here, if that's how you roll. Take some good olive oil and cover the bottom of the pan, just a couple of millimeters or so. Then turn the heat to medium-high and let the oil get nice and hot.

While that's happening, put a couple of spoonfuls of flour into a shallow bowl, add a splash of milk, and whisk them together with a fork (or a whisk, if you happen to have one handy) until you have a thin batter. This isn't tempura, folks -- go too thick and you'll overwhelm the blossoms. Sprinkle in some kosher salt, whisk a little more, and you're good to go.

Dip your finger in the batter and flick it in the oil. If the oil sizzles, then you're ready to make the magic happen. Take a blossom between your fingers and dredge it in the batter -- I find a twirling motion to be particularly effective. Slide the flower carefully into the oil, turning it in a couple of minutes or so, when the pan-facing side is golden and crisp. You're done when the blossom is uniformly gorgeous in all its summer splendor.

Set it on a paper towel, give it another dash of salt, and pop it in your mouth as soon as you're sure you won't burn your tongue. Then invite your friends to hang around the kitchen. You'll feel satisfaction akin to sharing a really great secret. And they'll be eternally grateful.

See? There's nothing to be scared of... except missing out.